kawaii shop modeS4u is having a huge kawaii giveaway. There's a ton of cute items to win so go on over there!
They're also having another giveaway on cutesypoo toys, go here to enter! Have fun!
November 24, 2010
October 28, 2010
Halloween
I've been very busy, not only writing proposals for my final papers, but also working on a huge Haunted House project with my boyfriend and friends. Our theme is The Evil Dead, and the four sections take you around and through the large backyard. We spent a lot of time on this, there will be live actors (I'm excited to scare people!), fog machines, crazy lights and surprises. I handmade a lot of the props in my section (including a Necronomicon, Book of the Dead!) and I can't wait to post some pictures after the show.

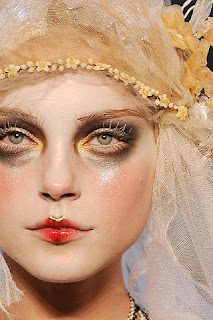
Before then, I am also attending a literary Halloween party on Friday. Hopefully I'll get a good picture of my costume as well to post here. I'm going as Queen Titania from A Midsummer's Night Dream and looking to some John Galliano fashion shows for inspiration for the makeup:
I'm also baking some fun cupcakes with Halloween themes (candy corn and bones and gravestones made from white toostie rolls). Happy Halloween!

Before then, I am also attending a literary Halloween party on Friday. Hopefully I'll get a good picture of my costume as well to post here. I'm going as Queen Titania from A Midsummer's Night Dream and looking to some John Galliano fashion shows for inspiration for the makeup:

I'm also baking some fun cupcakes with Halloween themes (candy corn and bones and gravestones made from white toostie rolls). Happy Halloween!
October 26, 2010
Lolita Dreaming

Lolita Dreaming by calliandra featuring a polyester coat
For the Vida La Frills contest!
My dream Lolita outfit is perfect for walking around campus in autumn and studying literature!
September 16, 2010
Do-It-Yourself Princess Canopy
I made this cute canopy for my bed for less than $20! Read the full How-To Article!


My Materials

The Finished Product!
Posted To:
September 10, 2010
Book Review: Straight Man
Straight Man by Richard Russo


The rebel in an English Department is the only man not trying to play the straight man, because in Straight Man by Richard Russo, everyone is trying to play the straight man. Our rebel hero Hank Devereaux plays many different roles: chauvinist, innocent, guilt provoker, ingrate, curmudgeon, misogynist, religious, but never the straight man. He makes everything interesting; he makes people laugh and/or groan. I am attracted to just such a man, though my version is studying psychology while I am entering the English realm, which explains why I took such perverse delight in Hank’s antics.
The fact that everyone else is so serious and unhappy does indeed evoke the question: Why? Why not take things less seriously and have a little fun?
There is the right amount of absurdity and the mundane that makes this novel so appealing and truthful. The contrast and interweaving of comedy and tragedy is profound, and while the jokes are often at the expense or because of our hero, Hank is ultimately a likable character. You don't have to be an English major to laugh out loud at this one.
September 2, 2010
Shabby Frames
I bought some dollar tree frames and thought i would have fun making a lil gift/keepsake for my boyfriend and I.
Here is the ugly before picture!

The first one I made for myself as it was the experimental one. It was my first time using my mini-drill. It has many different heads you can put on it for sanding, polishing, drilling holes, carving and more. I used the carving tool to carve our initials into the bottom frame of the wood.

Be sure that you wait long enough for the crackle medium to dry, and also that you use only one stroke to get the paint on. The second turned out really well once I paid attention to these two factors. It looks cool and it really adds a lot of texture.

The pink one turned out fun anyway as I played with different layers of paint to create texture. I did have to go back and repaint the lettering white so it would contrast more.
Washes: Mix a few drops of dark paint with some water. Paint the wash over all or parts of your frame. If you have some sort of carving or texture the wash will really get into all the crannies and help add to the texture.
Metallics: use metallic paints to add more texture to the frame. On the pink frame I used a bit of bronze paint. Because metallic paints are thicker, it’s easy to rub on just the right amount. Use a paper towel or cloth to rub the paint on and smudge it just right. A little goes a long way.
More painting and distressing tips here!
More painting and distressing tips here!

Pictures: Try sepia tones, or aging the picture with distressing ink. Draw a silhouette by tracing a picture (remember the shapes are the most important feature when selecting or taking the photo). You can also crinkle and rough up the paper to distress it further.
Finishing Touches! I added some natural-colored yarn in a lil bow around the pink frame to add more three-dimensionality. And here are the finished products! I'm sure I might be changing out the pictures when we actually take some decent pictures of ourselves, but for now it's alright.

Thanks for reading! <3
Posted to:
somewhat simple
the shabby chic cottage
domestically speaking
me and my bucket
blue cricket design (she also has a Vintage Pearl giveaway!)
black kats design
the diy show off
finding fabulous
a little knick knack
the shabby chic cottage
domestically speaking
me and my bucket
blue cricket design (she also has a Vintage Pearl giveaway!)
black kats design
the diy show off
finding fabulous
a little knick knack
August 24, 2010
Tuesday Drabbles
No big update today, I'm being lazy as I'm starting classes this week. Here is a little preview of my desk so far:

Mug: Has my morning smoothie! Mango and strawberries today.
Lamp: The plain white looks too new, distressing will commence soon.
Jar: Just a little jar for knickknacks and buttons.
Cards: Some cute Austrian Playing Cards I found at a street fair.
Candle Holder: I wish I had bought another one of these, my sister has one too. It has a lil postage stamp you might not be able to see and says "Jardin Paris", with a rose on the left side.
Frame: Dollar Tree craft. I engraved mine and my boyfriend's initials with my little mini-drill tool. I am planning on making one for him too (in blue of course). I haven't decided what picture to use yet, we don't have a whole lot of pictures of ourselves. Perhaps I'll just paint little silhouettes of our portraits. What do you think?
August 21, 2010
The Maiden's Nightstand
My nightstand redo. Being new to cataloging my refurbishing, I forgot to post a true before picture. This one will have to do. Suffice to say, it was a boring plain $10 nightstand my boyfriend found for me at the swapmeet.

Here's some of the details.

After some toil and sweating in the summer heat, I have a piece I can be proud to put in my little room!

1. Paint chair to match mint green desk.
2. Make a curtained canopy for my bed.
3. Find and paint some sort of little bookshelf.
4. Find some sort of chest or basket to put my towels and blankets into (they are in an ugly black crate right now >.<)
5. Antique-ify/distress my long mirror.
6. Find a rug that matches my color scheme (you do not want to see my current rainbow rug, trust me!)
Thank you for reading! ^O^


My Sanctuary Quest Begins
This blog will catalog my art, designs, and mainly the designing of my lil space in a 13x10 room just a couple of blocks from my college. As a student I am working on a budget, and hope to pass on my frugal and cute ideas.
Header is from The Graphics Fairy! So cute!
Header is from The Graphics Fairy! So cute!
So for now, here are just some watercolor doodles I did earlier. I never did much with watercolors (besides practicing marble for painting for the theater stage), but I think it would work well with some sort of mermaid/seascape scene. I love the soft tones one can achieve with watercolors.

Subscribe to:
Posts (Atom)